

ucfjennifer
-
Posts
204 -
Joined
-
Last visited
Content Type
Profiles
Forums
Gallery
Blogs
Store
Articles
Events
Reviews
Products
Everything posted by ucfjennifer
-
I think I'm going to make the RSVP due late Jan or early Feb. I bought my dress last Friday! It will be in by early November. I hope to lose a little weight before then! Are you sending an invite to the people that have already booked? I keep going back and forth on this. Option 1 - Send them a slightly different version of the invite when I send the rest of them in Oct. And send pre-travel brochure and luggage tags to everyone going in Mar. Option 2 - Send invites to those that haven't booked in Oct. Send pre-travel brochure and luggage tags to those booked in Jan. And send remaining out as people book. I know I'm over thinking, but wedding brain is a serious problem! Haha!
-
I just wanted to stop by and say congrats to all of the August brides!
-
 Here is the PowerPoint template! Luggage Tag.pptx
 -
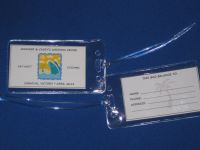
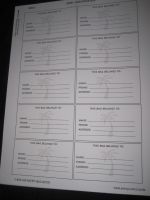
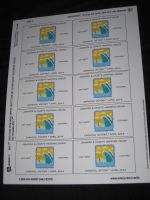
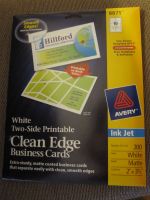
Hi Ladies! I started looking at other threads for luggage tags and immediately decided to make them. I got a "little" ahead of myself doing them now, as I won't actually be mailing them to our guests until a month or two before our wedding. That's OK, it's one less thing I have to do later! They were REALLY easy and ended up costing about 38 cents per tag. Materials: -Advantus Proximity Badge Holders, Vertical 2-3/8 x 4-3/8, Clear, 50 per pack (purchased on Amazon) -Bluecell 6 Inch Plastic Luggage Loops, Clear, 100 per pack (purchased on Amazon) -Avery White Two-Side Printable Clean Edge Business Cards, 200 per pack (purchased at Staples) Instructions: 1) Design the front and back of the luggage tag in PowerPoint. 2) Download the business card template (Word format) from the Avery website. Paste the image for the front of the tag on one full sheet of the template. Then paste the image for the back of the tag on a second full sheet. 3) Print the front image on one side of the business card sheet and then flip over and print the back image. Front of sheet Back of sheet 4) Fold the sheets along the lines to separate the sheets into individual cards. This was my favorite part as no cutting was required, they separate on their own. Quick and easy! 5) Insert the business card into the badge holder and attach the loop. Luggage tag complete!
-
Ucfjennifer's DIY Luggage Tags!!!!
Images added to a gallery album owned by ucfjennifer in Pictures from (pre-2014) Forum Topics
-
-
From the album: Ucfjennifer's DIY Luggage Tags!!!!
-
From the album: Ucfjennifer's DIY Luggage Tags!!!!
-
From the album: Ucfjennifer's DIY Luggage Tags!!!!
-
From the album: Ucfjennifer's DIY Luggage Tags!!!!
-
Isn't it so fun finding out another cabin booked?? We have 13 booked with 9 months to go. We are doing Boarding Pass invites and sending them out in a few months.
-
Hi Megs!! Your wedding is 2 weeks before mine! I know exactly how you feel, excited and overwhelmed at the same time! We've invited our friends & family on a weekend cruise on the Carnival Victory and will be having the wedding while our ship is docked in Cozumel. We sent the save the dates in April/May and so far we have 30 people (13 cabins) booked, including us! What is everyone working on now? I'm going to start dress shopping in a couple of weeks. I'm also going to start designing the invitations (boarding passes). I'll be making one version for guests that have not booked and then a scaled-down version for those that already booked. For those sending invitations, when are you sending them? I was thinking 4-5 months out, but the holidays are in the way! So now I'm thinking early Nov so I don't get lost in the holiday shuffle and it gives them time to save & book.
-
Thanks! I'm thinking of doing the boarding pass invites!
-
Here is the "blank" template! Save the Date Passports.xlsx
-
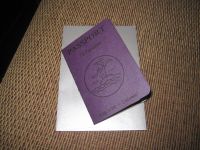
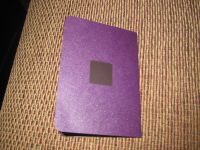
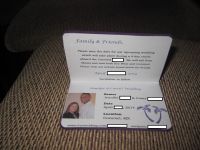
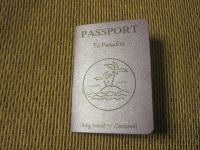
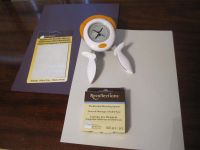
Hi Ladies! I found so many great threads on the passport invites, that I decided to attempt a scaled-down version to use for our save the dates. I'm happy with the way they turned out and they ended up costing less than 60 cents per passport (not including the paper/corner cutters and mounting squares since I already had them). Materials: Paper Cutter Corner Cutter Double-sided Mounting Squares 8.5 x 11 Plum Metallic Card Stock (Michaels) 8.5 x 11 Gray Stationary (Staples) Magnets (Michaels) A1 Silver Metallic Envelopes (Envelopes.com) Outside Cover (template on 1st page of attachment): 1) Design Logo - I designed a simple logo in PowerPoint using a palm tree image and our names. 2) Design Cover - I decided to create my template in Excel. I'm in it all day for work so it is the software that I'm the most comfortable with. 3) Print/Finish Cover - I setup the template so it will print 4 mini passport covers on each sheet of card stock. I separated them with the paper cutter, then folded each in half and used the corner cutter to cut the corners. The size of folded mini passport is 2.6 x 3.75. Print 4 per sheet - ink is actually darker than it appears in these pictures Folded size 2.6" x 3.75" Inside (template on 2nd page of attachment): 1) Top Half - We wrote a brief note to our guests to let them know the destination and dates. 2) Bottom Half - Included our basic wedding day information and our wedding website. 3) Print/Finish Insert - I followed the same process as above using gray stationary for the inserts. Assembly: 1) I used the double-sided mounting squares to attach the insert to the inside of the cover. The front cover is upright (portrait), but the passport must be turned on its side (landscape) to view the inside information. 2) Added a small magnet to the back. 3) Mailed in A1 metallic envelopes. The envelopes were a little larger than the passport, but they got the job done! I'm going to make a generic version of my template and add it to this thread in case anyone would like to use as a starting point to make your own!
-
Ucfjennifer's DIY Mini Passport - Save the Dates!!!
Images added to a gallery album owned by ucfjennifer in Pictures from (pre-2014) Forum Topics
-
-
From the album: Ucfjennifer's DIY Mini Passport - Save the Dates!!!
-
From the album: Ucfjennifer's DIY Mini Passport - Save the Dates!!!
-
From the album: Ucfjennifer's DIY Mini Passport - Save the Dates!!!
-
From the album: Ucfjennifer's DIY Mini Passport - Save the Dates!!!
-

From the album: Ucfjennifer's DIY Mini Passport - Save the Dates!!!
-
From the album: Ucfjennifer's DIY Mini Passport - Save the Dates!!!
-
Just wanted to stop by and say good luck and best wishes to all of the July brides!! Enjoy your special day!!
-
Ring bearer vs. Ring Security
ucfjennifer replied to SammyAnna's topic in Destination Wedding Dresses, Wedding Attire & rings
My friend just did this at her wedding last month! Her nephew carried the ring in a plastic safe. He was dressed in his suit and had on an earpiece and sunglasses. It was great and everyone loved it! -
I love coming back to so many posts!! This was a really great idea for a thread! Work has been terrible this week but I just managed to hit 150 tonight! It feels good! Lol!
-
I did it!!!!!! 150! It feels good! Lol!
