

olive0y1
-
Posts
239 -
Joined
-
Last visited
Content Type
Profiles
Forums
Gallery
Blogs
Store
Articles
Events
Reviews
Products
Posts posted by olive0y1
-
-
Hello!
I've been on a DIY lately and my latest creation that I wanted to share is my burlap ring bearer pillow that I upcycled from a thrift store find. If I remember correctly, I got two small (5.5 in x 5.5 in) pillow and two small flower girl baskets for about $3. The pillows worked out perfectly since my ring bearers will only be about 8 to 6 months respectively by the time our wedding comes around March next year so I thought I'll have it wrapped around their bellies.

I've also been looking around for a DIY tutorial online on how to put a burlap pillow, but have had no luck. I did have an idea, however, on what I wanted mine to look like from Pinterest ideas so I thought, what the heck, I'll wing it. So here's my first attempt at this

My idea in mind
I trimmed the lace that was on the edge of the pillow & cut out the lace ring holder
I cut two pieces of burlap that's just a little bigger than the pillow (7x9 inches)
I didn't want to remove the filling in the pillow; and since I wanted the rough edge look, I thought it'd be easier to just insert the pillow in burlap. So...
I sewed the three edges.
Inserted the pillow
Placing my idea in mind to see how it's coming together
Sewed the top ede w/ the pillow inside. NOTE: Make sure to leave enough room up top so it fits in the sewing machine just to be safe. THEN I trimmed the edges to make it look even.
Sew the lace to the side edge
This is how the back looks like. I left it like that so the babies can fit in it. I'll probably cut it so it can just tie on their backs.
Glue the lace ring holder
Glued the fabric flower I also create from a turtorial like this: http://www.creaturecomfortsblog.com/home/2012/4/3/diy-fabric-peony-flower-accessories-gift-toppers.html
Finished product w/ my engagement ring to test

The End!

-
Thanks for the share!
-
-
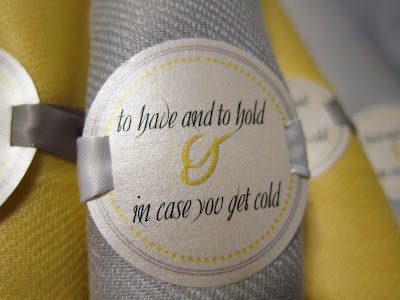
Love the quotes on each one!
-
They also have Msnowmrs now. http://www.missnowmrs.com/ or you can check it here for reviews http://www.weddingwire.com/biz/missnowmrs-com/d48ad571852ec8aa.html
-
Btw, does anyone know how to change the colors on these on Word?
-
Thanks for the templates, ladies!
-
Great ideas! To be posted on our site too!
-
Originally Posted by LolaTX

I also made these from Vistaprint:
Pre Travel Brochure (Front) Pre Travel Brochure (Back) Packing List (Front) Packing List (Back)
Pens Stickers for Kleenex at Ceremony
Oh Shit Kit Tags Magnets for OOT Bags Stickers for 1st Aid Kit in OOT Bags Stickers for Maracas
Looks great!!
-
Thanks for sharing, ladies! These are great ideas!
-
-
Originally Posted by CherylSewell
BTW.... it's $1 per bag.
Cheryl
Ooo thanks for this info!
-
Great cheap idea! Thank you for the share!
-
Originally Posted by socialgal
I stayed at the Hampton Inn & Suites Miami Airport South Blue Lagoon (www.hamptoninnmiamiairport.com/) and at the Hampton Inn & Suites Miami Brickell Downtown (www.hamptoninnmiamibrickell.com/). Both hotels have breakfast included and free Wi-Fi. The Airport location has airport shuttle, they have a paid cruise shuttle and a cab drive to the port will go for about $25. The Brickell location is about a year old, very nice and updated and walking distance from Mary Brickell Village (the place to eat and have fun) and a short free monorail ride from Bayside MarketPlace. This new location is about a $15 cab ride from the port.
Awesome!! Thank you very much for your input! To clarify, is the $25 shuttle/cab ride a per person deal?
-
Will take a note on this one, thank you!
-
Thank you for the share, ladies! Getting ready to get this OOT bags tackeld

-
Originally Posted by LAtravelgirl
Dollar Tree has a different brand, but it comes with a ton more bandaids.
I'll def. look into that!

-
More templates, thank you!
-
Originally Posted by acireta
I LOVE these! Thank you thank you for sharing!!
-
-
THank you for the templates!
-
Thank you for the templates!
-
Originally Posted by AishaB
Hey ladies, thought I would share some templates with everyone. I have gathered these while visiting other sites such as = The Knot, Weddingbee, Magnificentbliss, Aylee, Martha Stewart.com, and other wedding websites. Unfortunately, I didn't always take note of which template came from where. I am doing much better now. Hope these help someone.
Thank you for these!
-
Originally Posted by marichu77
I think I spent the most time on the OOT bags for this upcoming wedding. It took forever to finally decide on what bags I wanted, and then it took months to gather all the items I wanted as the contents of the bags. Plus it didn't help that I wasn't sure exactly how many people were going. But all the RSVPs are in, the final headcount is done. And here it is:
I got the bags from a wholesaler on ebay: http://stores.ebay.com/The-Deal-Rack
It was $165 for 48 pcs. I think there may be even cheaper options out there (such as the Dollar Store), but I couldn't find a tote bag like this in yellow. I'm very happy with the quality of the bag.
The tags on the bag are from Paper Presentation.
I got the first aid kits ($1 each) from medco.com and almost all the meds that I packed in there were from medco.com as well.
Here is the template for the label on the first aid kit. I just bought a whole sheets of label paper from Staples and printed on them. Then I used a paper cutter to cut each label and attached them to the first aid kit.
Here are the packets all in the first aid kit: I got Advil, Emergen-C, Pepto Bismol, Tylenol (not from medco), Imodium A-D (the blistore packs), and LifeSavers candy (from CVS)
I got the idea for the Imodium A-D envelope from another bride on BDW but I can't remember who! They look really cute.
Here is the template for it and the safety info that I inserted as well:
I also bought some antibacterial hand gel from Bath and Body when they were on sale for about .69 cents each, some lip balm from Avon when they were also on sale (pink for the ladies and just white ones for the guys), tissue packets that one of my mom's co-workers got at a dollar store (9 packets of tissue sold for $1), Shout wipes from medco.com. I placed them all in ziplock "biohazard" bags that I was able to get from people who work in hospitals, and topped it off with a camouflaged label that I printed out using cardstock. Here's the finished survival kit product:
Here's the template for the bag topper. I'm not sure if the background camouflage image and the "Survival Kit" font will show up. In any case, you can download the font in dafont.com. The font's name is "Steamer".
Included are also yellow and gray pashminas which I bought from Pioneer Group in downtown NYC. They were 12 for $26. Not shown are rolled up handkerchiefs for the men. All the tags were made by me by printing on cardstock and then using a 2-inch round cutter to make each tag. I used a paper cutter with rectangular holes to thread the ribbon onto each side of the tag.
Here is the template for the pashmina tags:
I also have water guns that I bought from Oriental Trading (25 for $10) and playing cards that I got from a wholesaler in downtown NY ($6 for 10). Ignore the pink pashmina in the picture.
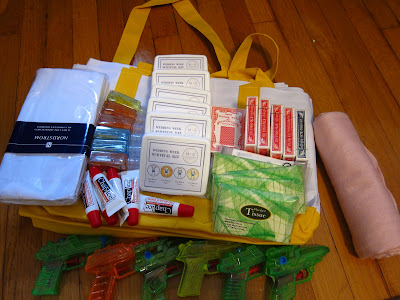
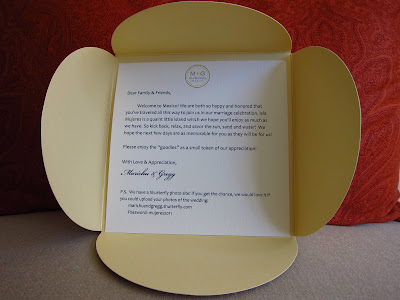
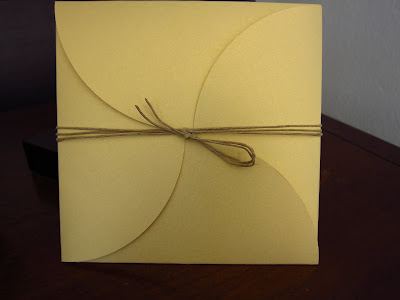
Finally, there's the welcome letter that I will place in the front pocket of each bag. The petal enclosure and paper were all from Paper Source. The twine was from Michael's. I will also be placing a travel brochure and wedding timeline in the bag but I still have to finish designing it on VistaPrint.
And that's it! I hope this helps someone out!!
These are awesome, thank you! I love the Montezuma's Revenge cover! haha


DIY Burlap Message Board
in DIY Forum: Passport Invitation Template, Boarding Pass Invitation Templates and more
Posted
This was my inspiration from Save On Crafts site w/c, btw, has great deals on wedding things! http://www.save-on-crafts.com/memoboard.html
I wanted to save so I took advantage of the deals at Michael's Crafts Store on Black Friday and purchased a 24X30 blank canvas that was buy one get one that looks something like below.
I purchased a burlap at Joann's Fabric that I also used in my ring bearer pillow. Link found here for that DIY: http://www.bestdestinationwedding.com/t/83403/burlap-ring-bearer-pillow-diy. They also have a skeleton key burlap style as well if you're interested.
I utilized this instruction: http://www.everycreativeendeavor.com/2011/11/burlap-message-board-tutorial.html for the basic board creation.
I purchased the upholstery tack and string at Home Depot and also got the corkboard from Michaels.
I just hot glued the corkboard onto the canvas, wrapped the burlap around and stapled on the back. I trimmed the excess burlap to make it look neat.
As for placing the tacks, this tutorial helped out a lot since I didn't get to take pictures: http://www.houseofhepworths.com/2012/03/05/diy-burlap-message-board/
I placed 5 tacks on each side and placed the string across each sides. I copied the amount of tacks they had from the inspiration board and this is how it came out.
I glued the string to the back and trimmed it off as well.
I'll be placing pictures of our parents and grandparents in this for our reception back home.