jb1013
-
Posts
32 -
Joined
-
Last visited
Never
About jb1013
jb1013's Achievements
0
Reputation
-

Jellyfish Restaurant
jb1013 replied to Natural's topic in Destination Weddings in Dominican Republic
Hello! We had 66 total guests and I did not want to spend the $1000 to rent out the entire place on Jan 7th of this year. There were a couple people that tried to join our party but to me I didn't care, I was too busy dancing!! The staff told them to leave and it wasn't an issue. Around 10pm there was no one else eating upstairs anyways. We did have people eating dinner and watching our party on the lower level but I would tell you to save the money! Your group will be having too much fun to care! Any other questions PM me Happy Planning! -
Jellyfish Restaurant
jb1013 replied to Natural's topic in Destination Weddings in Dominican Republic
Hello! We were married on Saturday January 7th and met with Mayte on Friday 1/6. It was about a 2 hr meeting, that included us having a tasting of the food. She had a wedding that night so we went over all the decoration and transportation details and picked the drinks and then she sent us upstairs to have a tasting of the menu. You do not have to have a tasting and that could cut an hour of time off, but who turns down free food? I would say plan at least 2 hours with Mayte. If you have any other questions for me PM me, I do not get on here too often so if you send me a PM Happy Planning! Jen -
Jellyfish Restaurant
jb1013 replied to Natural's topic in Destination Weddings in Dominican Republic
Hello Ladies! We were married at the Jellyfish 1/7 and I am just now returning to a normal schedule. I will try to do a review. As for the flowers, they were almost EXACTLY what I send her. I did real flowers for the bridesmaids, myself, groomsmen and even for parents and grandparents and I think out cost was about 400. We chose to do fake flowers for everything else to keep cost down. Hope that helps, Mayte is truely amazing. We unfortunatley had some issues that were out of her control, but I would still plan it the same way if I had to do it over! -
"Into the Wild" lotion - 45 available
jb1013 replied to jb1013's topic in Buy, Sell, Trade or Freebies!
These are sold, thanks Ladies! -
Jellyfish Restaurant
jb1013 replied to Natural's topic in Destination Weddings in Dominican Republic
Hey Ladies! I have about 66 total people booked for our wedding and Mayte quoted me $600 for the the ceremony on the beach and Lounge area set up on the beach as well and then $700 for the decorations/entrance/sweet table. Hope that helps! Jen -
"Into the Wild" lotion - 45 available
Images added to a gallery album owned by jb1013 in Member Picture Galleries
-
-
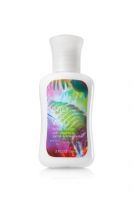
Hello! I am almost finished with my OOT bags and decided to only give 1 lotion per room instead of 1 per person, this means I have 45 lotions leftover. The lotion is from Bath & Body Works and they no longer sell this lotion in travel size. I paid $1 per bottle and I am asking $40 for 45 lotions and this DOES INCLUDE shipping via Fedex. If interested let me know! Happy Planning! Jen
-
Jellyfish Restaurant
jb1013 replied to Natural's topic in Destination Weddings in Dominican Republic
Meg - wow! Thank you so much for your song list!! You are amazing! -
Okay Ladies, these are finally done. Thank you so much for all the wonderful posts and pics on this site, I wouldn't of been able to pull this off on my own. It also helped that my sister is a graphic designer so I told her the invites I liked and what I wanted as details and she created the invites and the labels. This it was up to me to cut, score, perferate, punch, glue and cut some more I would not call myself crafty so if I can pull this of then everyone can. I made 140 of these invites and sent them out about a month ago, I instantly had comments about how awesome they were....most people didn't even know they were DIY. It made it totally worth the 2-3 weeks of cramping hands I did not have any supplies so I bought a Personal paper trimmer from Michaels with a scoring and perfrating blade. http://www.michaels.com/Fiskars%C2%AE-12-inch-Personal-Paper-Trimmer/sb1554,default,pd.html?start=38&cgid=products-scrapbooking-fiskars I also bought a corner cutting tool which was so helpful and I used it on my invites and the sleeves. http://www.amazon.com/CARL-CP6A-Corner-Rounding-Punch/dp/B0010CC72Q I bought all my cardstock and envelopes from paperandmore.com and I found some great wrapping paper at Target that I used for the liner I created for the envelopes! I would attach the template for the invite itself but it is in PDF and I am having my sister blackout our address before I post Sorry the pictures are poor, I took them with my phone Here is the invite itself...it has 3 pages with the last one a RSVP that can be detached and sent to us...I connected all 3 with a small square brad. This one is of the sleeve - I used a "Fun in the Sun" stamp on the corner, cut at an angle and then glued the end so the invite wouldn't fall out I used ribbon raffia from from The Container Store to close the sleeve Here is a pic of the envelope liner, I don't think it was needed but I thought it looked cool and gave the whole thing a pop This is envelope with the label
-
Okay Ladies, these are finally done. Thank you so much for all the wonderful posts and pics on this site, I wouldn't of been able to pull this off on my own. It also helped that my sister is a graphic designer so I told her the invites I liked and what I wanted as details and she created the invites and the labels. This it was up to me to cut, score, perferate, punch, glue and cut some more I would not call myself crafty so if I can pull this of then everyone can. I made 140 of these invites and sent them out about a month ago, I instantly had comments about how awesome they were....most people didn't even know they were DIY. It made it totally worth the 2-3 weeks of cramping hands I did not have any supplies so I bought a Personal paper trimmer from Michaels with a scoring and perfrating blade. http://www.michaels.com/Fiskars%C2%AE-12-inch-Personal-Paper-Trimmer/sb1554,default,pd.html?start=38&cgid=products-scrapbooking-fiskars I also bought a corner cutting tool which was so helpful and I used it on my invites and the sleeves. http://www.amazon.com/CARL-CP6A-Corner-Rounding-Punch/dp/B0010CC72Q I bought all my cardstock and envelopes from paperandmore.com and I found some great wrapping paper at Target that I used for the liner I created for the envelopes! I would attach the template for the invite itself but it is in PDF and I am having my sister blackout our address before I post Sorry the pictures are poor, I took them with my camera Here is the invite itself...it has 3 pages with the last one a RSVP that can be detached and sent to us...I connected all 3 with a small square brad. This one is of the sleeve - I used a "Fun in the Sun" stamp on the corner, cut at an angle and then glued the end so the invite wouldn't fall out I used ribbon raffia from from The Container Store to close the sleeve Here is a pic of the envelope liner, I don't think it was needed but I thought it looked cool and gave the whole thing a pop This is envelope with the label
-
Okay ladies - I finished my boarding pass invites and have mailed all 140 of them. It took me about 2 weeks to completely finish and I had help from my sister who is a graphic designer, she took my ideas and made them reality. I printed everything off from my home computer. I bought all my supplies from Michaels since they always have a sale and/or a 40-60% off coupon. I bought all my paper and envelopes from Paperandmore.com. I also bought wrapping paper from Target and created the envelope liner from scratch. As much folding, cutting and more cutting was involved it was soooooo worth it. Ultimately the total cost of all the paper supplies I used along with puncher and cutting tools was about $330. I should of took pics with my camera and not my phone, but they give you an idea..... This is the actual 3 boarding passes, the last one is a RSVP as well that can be torn off and mailed back to us... This is a pic of the sleeve, I rounded the corners and made a angled cut to show the invite...I also glued the end so the invite wouldn't slipout... Then at the last minute I bought a stamp and stamped the "Fun in the Sun"... This is what the final product looked like, I bought Pink and Silver wrapping Raffia Ribbon from The Container Store ... And this last picture is what the envelope liner looked like once I was done.... Here is the label, I really wanted "Ticket To Paradise" on there somewhere:) Since I pulled a lot of these ideas from this site and have continued to do so I wanted to share this with everyone. I have already had many guests say they are the best invites they have ever seen and a some of my friends did not even know I made them myself, so ladies....trust me, if I can pull it off so can all of you!!!
-
Jellyfish Restaurant
jb1013 replied to Natural's topic in Destination Weddings in Dominican Republic
Here ya go.... [email protected] - Aurelio Sanchez Megs - That is great! If you can either post the song list here or email me a copy as well that would be absolutley wonderful! [email protected]. Good luck in the marathon! -
Darn it! No I didnt even think about it! I'm usually all over that too! I already ordered and I should receive them today, I wonder if I call if they would give me a break
-
I would just like to let everyone know that the Shopbubba site has brought back the classic pink 20oz mugs!! I was so excited, not being from Canada and not having any Walmarts around me that carries more than 2 Bubba Mugs at a time I was super excited about the Pink mugs. They also have a couple coupons out there, 20% off $200 or more. I bought 60 mugs for our OOT bags - pink for girls and black for guys - and with shipping and everything it was about $6.90 a piece, which isn't bad. Now just to figure out how I am going to get them all to the DR!