

becks
-
Posts
4,858 -
Joined
-
Last visited
-
Days Won
1
Content Type
Profiles
Forums
Gallery
Blogs
Store
Articles
Events
Reviews
Products
Posts posted by becks
-
-
Thanks! I can't tell you all what a pleasure it is working with you on your wedding planning!
And you guys have some amazing ideas. I can't tell you the number of things over the last two and a half years people have asked if I could produce that have become a main part of my collection - everything from chapstick labels and tops for goody bags to ID badges! That and all of the amazing new takes on invitations... you guys are the best!
At some point I'll post some photos of the really custom pieces you all have inspired!
-
Originally Posted by nolacruiser6

Great info, are most people sending these out prior to the wedding or are you including them in the OOT bags???
Most of my clients (and us, too) send them prior to the wedding with a brochure or newsletter with general information on the location, what to pack, etc. I think the nicest thing about the luggage tags is they help your guests recognize each other as they are at the airport or standing in the customs & immigration lines, so having them before they travel is a bonus.
-
I just wanted to let all of the DIYers know that another forum I'm a member of is having a "Garage Sale" tomorrow, Saturday August 20. Stationers from all over the country will be participating, selling off unused and overstock paper, supplies, equipment etc. at (or below) wholesale cost.
I have seen some of the items for sale, and many of them are things that aren't available without a wholesale license, so if you're in the market for cardstocks, or other DIY supplies, here's an opportunity to save a bit.
Again - it won't be accessable until Saturday (probably at midnight Friday). Setup day is today so it's asking for a password, but that will be removed when the sale is open.
Enjoy!
http://letstalkstationery.com/garagesale
-
It looks really great!
I agree that the introduction of a second (script) font to highlight certain elements could give it a bit of a pop.
Also, if it were me, I'd move the second paragraph up a bit (you can add space between the other paragraphs), move the "to" that's on it's own to the line above or below, and adjust the wording so it doesn't read "honor and celebrate... celebration"
You might also want to add your wedding date - lots of people like to know that information.
Fabulous work!
-
I had a friend ask about this invite and the only place I could think to find it was BDW. And then I realized that it's still just as funny and needs to be bumped!
-
Here's my suggestion - figure out what you're planning on printing first... If you are going to use metallic paper for anything a laser is your best bet. But if you're going to do iron-on transfers, you'll have to have an inkjet. The other thing to think about is whether the printer can handle heavier cardstock - a manual feed tray that doesn't require going through lots of rollers is your best bet.
Go to Staples, BestBuy, or wherever and take a look at them. I suggest taking a page with text and an image on a USB drive and printing one on the demo models. Take a look at the consistency of the color, the tightness of the print, etc. And take along a few sheets of cardstock and see if the pages get stuck (just use the manual feed option).
As far as brands, Epson has excellent color coverage, HP is really user friendly and has gorgeous, tight printing. those are the only two I know anything about. And take a coupon with you! I know Staples is running a 15% of any in-store purchase right now.
Good luck!
-
I have a stock of cardstock cut to size for boarding passes for sale (I've switched my cutter and can't use these any more). They are pre-cut to 3-1/4 x 8-1/4 inches, in premium bright white matte cardstock (100#). These can save you quite a bit of time and effort in cutting if you are making DIY boarding passes.
I will sell in batches of 50 sheets for $3.00 plus shipping.
PM me if you are interested.
-
I have about 200 clear plastic luggage tag straps in a style I'm no longer using - similar to those pictured below.
I will sell them in batches of 25 for $1.00 each, plus shipping.
PM me if you are interested.
-
You can find a huge variety of "free for personal use" fonts at dafont.com.
Download the zip file, extract the .ttf file and copy and paste it into your fonts folder (in your windows folder).
Then you can access them in any program.
-
Hi Jen: I'm so sorry but I never got your message - I just went through both e-mail accounts and my PMs and didn't see anything that might have been from you.Quote:
Originally Posted by JenB I contacted rebecca last week and still have heard nothing in return...........
Feel free to e-mail me directly at [email protected] or send me a PM. -
I've had really good luck with a tailor in mid-town. I found him totally by accident when I needed some pants hemmed and he's done just about every type of garment for me at this point (dresses, suits, blouses). Plus his prices are reasonable.
Mid-City Tailoring
28 W 44th St. (in the lobby of the building), between 5th and 6th - the building is pass through, so the other side is 25W 43rd.
(212) 719-2215.
Ask specifically for Oscar.
-
I haven't been to Aruba, but DH and I went to Tahiti for our honeymoon and LOVED it. Don't stay on Tahiti - go to one of the other islands. We spent 5 days at the Sheraton Moorea (really nice because there's an easy boat that runs every hour) and used points to get a regular room and paid for an upgrade to an overwater bungalow - it wasn't too pricey. Note that it is SO quiet at night - there's literally no nightlife on the island at all.
However, the thing we did that was even better was a cruise on the Paul Gaugin (Regent). We went to a whole pile of islands, scuba diving, fun trips, etc. And with Regent your alcohol is included in the price so it was a steal. Plus, there's stuff to do at night, fun people to play with, etc.
We went in November as well - the weather was PERFECT.
-
has anyone had them removed? it sounds like they're not supposed to damage your natural nails, but i'm curious about anyone's experience with them.
I had mine taken off a week and a half ago and went back to a regular old mani. I MISS them!!! My nails are healthy, but are a little bit thinner because they buffed the tops of my nails when they originally put them on. They also seem a bit prone to chipping/peeling, but then, they always have.
I figured I'd take a little break from them, but I'm ready to go back.
-
Yeah... mothers in law... I tell every woman I know to marry an orphan. and then I wonder why they laugh.
I can't stand mine. And it's next to impossible because everything she does comes from the right place, and is well intended, but it's just so awful.
I've had her tell me not to lift heavy things because it would damage my womb (yes, she said womb).
I've had her tell me that I should share things with her the way I do with my mom because my mom lives on the other coast.
I've had her come to my house (mind you, the day after the housekeeper was there), and offer to clean.
I've had her go through my personal papers (while I was at work) and call me to see if she can organize them for me. (Yes, even my tax returns.)
I don't like to hug or kiss her when she visits, but she grabs me and kisses me anyway, even when I push her away. And ALWAYS leaves a massive orangy-red lipstick mark on my face.
It's never ending. And it doesn't help that my MIL comes from a generation older than my mom and a culture where mothers are invasive. I've sat down with her privately and had conversations about boundaries, and it's helped... for about a week each time.
On the white dress, it is inappropriate. And anyone who knows anything about wedding manners knows you don't wear white unless your the bride. Personally, I'd suggest having you FI say something. Like "mom, you know it's unacceptable for anyone other than the bride to wear white. Maybe you should save that for another occasion and find a new dress." Don't get involved in this one.
He's your FI's mother, make him control her.
-
Just tell your dad that he's not walking you down the aisle. Tell him it's not what you envision when you think about your wedding day. Tell him you hope that he isn't hurt, but it's just not what you want. He'll get over it. Him saying that he couldn't wait to walk you down the aisle may have been his way of letting you know that he would be happy to do so if that's what you wanted, rather than an assumption that he would.
As far as the dance, do whatever you feel like. We had no official dances (other than to kick things off), and it was a great party. If you don't want a father-daughter dance, don't have one.
-
I don't have a lot of personal insight, while my parents are divorced, it happened later in my life and they are still friends so it was easy for me.
To me, there are a couple of questions you should ask yourself:
(1) do YOU want him there - ignore strained relationships etc, do YOU want him there?
(2) Is it important to you that he know that you wanted him to attend your wedding?
Go with your instinct - if you want him there or want him to know you want him there, send the invite. Worst case, he declines.
Good luck!
-
Everyone loves their monogram and wants to put it on everything! And you should – they are gorgeous, personal and fun!!
One of the things that many of my clients ask me is how to use an iron-on transfer so that they can put their monogram on their OOT bags, t-shirts or other items. I figured that I would share with you the things I tell them
Here are my hints for using transfers:
- buy the right transfer paper,
- pick the right bag (or t-shirt, etc.)
- know how to flip your monogram
- printing on the highest print quality you can
- trim your image
- iron some more
Buy the right transfer paper
So, which transfer paper is the right transfer paper? It depends on the color of the fabric you’re putting the image on – dark images need transfer paper for dark fabrics to prevent the color of the fabric showing through the monogram. You don’t want your perfect pale yellow to look like a murky green when you iron it onto that blue bag! If you’re putting the image onto white or cream colored fabrics, you can use transfer paper for lighter fabric. One more note, if you’re putting transfers onto stretchy t-shirt fabric, they also make a stretchy transfer paper.
Pick the right bag
I mention purchasing the right bag (or t-shirt, or whatever). Buy cotton. Don’t buy synthetics. It takes a lot of heat to get the transfer to work and synthetics will melt and you’ll be stuck with no bag and you’ll need to buy a new iron.
How to flip your monogram
In order to put your monogram onto your bag, it has to be backwards when you print it. Then when you iron it onto the bag, it’s right side up again. So how do you do it? It will depend on what you have.
If you had your monogram professionally done, go back to your designer and let them know what you’re trying to do. Chances are that they will be more than happy to flip your image for you for free or for a nominal charge.
If you designed your own in Photoshop or another graphics application, there should be a button that will do this for you.
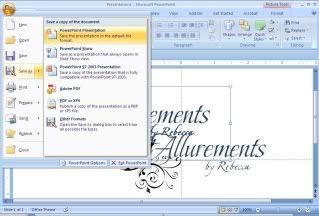
If you designed your monogram in a Microsoft format (Word, PowerPoint, etc.), I find that the easiest way to flip your image is in PowerPoint.
Here are some screenshots of how to flip an image:
1. First, open your monogram in Powerpoint.

2. If it’s not already a picture, you’ll need to convert your image into a picture format (I like .png best because it won’t have a background). Here’s how to do that (all the images are from Office 2007, so if you have a different version, I’ll try to tell you where to find the tools):
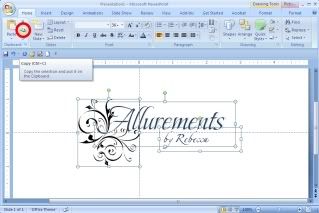
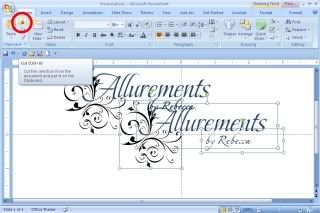
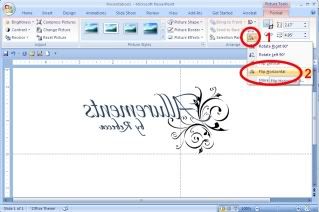
3. Now flip your image – click on the image, and then go to the Picture Tools menu, select the flip or rotate button and select Flip Horizontal, and you’re set! (other versions, the picture toolbar will be on the bottom of the screen, find the flip/rotate button and select Flip Horizontal)a. Select all of the components of your monogram by clicking and dragging your mouse to create a box around the entire image.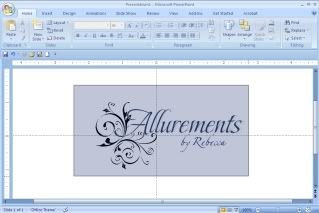
b. Create a copy (other versions: from the edit menu, select copy, or hit Ctrl+C)
c. Now select paste, then paste special (other versions: from the edit menu select paste special, or hit Ctrl+Alt+V)
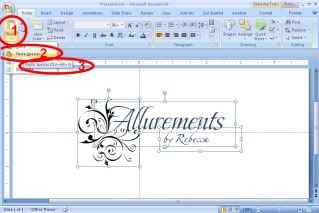
d. The paste special menu will open, select png.
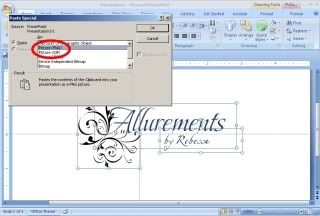
e. You’ll now have a copy of your monogram that is a picture.

f. Save a copy of this file with a new name so you don’t damage the original.
g. Delete the original monogram – select it like you did in step 2a, then hit the delete key or select cut. (other versions: from the edit menu, select cut)
Note that sometimes when you flip a monogram using Powerpoint (or Word) the image can blur a bit. If this happens with yours, you may be able to group the pieces and flip, or you can use the steps above to flip each piece of your monogram one at a time. You may have to adjust the location or level of the pieces as well.
Printing
Set up your print file – get the image to the size and shape you want and do a test print on regular paper at regular resolution to make sure everything is right. Also, if your monogram is being printed small enough, print more than 1 copy on each – transfer paper is pricey, so the more copies you can comfortably fit on a page, the better.
Once you are satisfied that the file prints the way you want, print one copy onto transfer paper at the highest quality you can. The process for this will vary from printer brand to printer brand, but generally, select print, when the print dialog box opens, select properties. In the properties dialog box, there will be a Quality tab. Set the print quality as high as you can. It will use more ink, but your monogram will look so much better on your bags.

If your test print on the transfer paper worked, you’re set to print them all.
Trimming your monogram
Once you have your monogram printed onto transfer paper, you’ll need to trim down as much of the blank space around the image as you can. I try to keep my edges to 1/8 of an inch or less.
The transfer paper has a shiny look to it when you iron it on, and it will look better if you can eliminate as much of the blank space as you can, so that your bag doesn’t show so much of the shiny edges. If you have a big white area in the middle of your monogram, this applies to that space as well – use an exacto knife or the tip of your scissors to gently start an area that you can cut out from the middle.
Ironing
Unfortunately, ironing on a transfer isn’t like taking wrinkles out of your favorite light cotton blouse. Actually, it’s sort of like trying to squash a big bug. Press hard, and press for a really long time to make sure it’s good and dead. Or in this case, stuck.
When I do transfers, I actually use a wooden cutting board (get a new one or wrap it in a couple of cotton pillowcases to keep your bags clean) rather than an ironing board, and I set it on the garage floor – concrete which won’t burn or dent if I drop the iron on it. And yes, the floor – the lower it is, the more of your bodyweight you can lean on the iron.
Set your iron at the highest setting, and turn the steam off. Position your transfer on the bag where you want it, and jump in. Spend a LOT of time on the edges – if anything is going to go wrong, the first thing will be the edges peeling. Move your iron in little circles, but keep it moving, and press down. Transfers are sticky when heated, so the more pressure you put on them, the better they will stick. And really iron – figure that for a 4x4 monogram you’ll want to spend at least 2-3 minutes ironing each one. If yours is bigger, it will take longer.
One last note – be prepared, you’re going to ruin at least one bag. Probably two. It’s just the way it is. But order a couple more than you have to have. You can keep the ones you ruin as a reminder of how much loving effort you’ve put into your planning. Plus, they make good reusable grocery bags. (As one of my favorite clients once said… saving the world one ugly bag at a time)
Good luck! Be sure to post pictures!
-
 5
5
-
Nope, no grinding. They do buff the surface down a bit - they need to take off the very top layer to make sure they stick, but nothing like the old gels with tips. And when they take them off, you can have a plain old mani and you'd never know. Even clear polish will look fine.Quote:
Originally Posted by Future Mrs. Griffith So they didn't have to grind down your nails like with normal gel nails?? I really wanted great nails for the wedding but also didn't want ruined nails when the tips came off so this is a great alternative! Thanks for sharing!
Putting it on takes a little longer than a regular mani - probably about 40-50 minutes. Taking it off takes about 30-40 minutes, so when I took off and put back on it was about an hour and a half. -
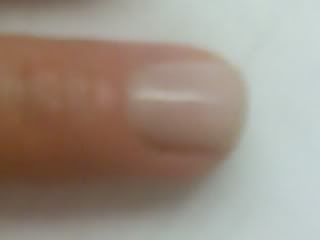
I'll apologize in advance for the quality of the photos (cell phone...), but here are a couple of photos for those who want to see. This is one layer of "Bubble Bath" and one layer of "Passion". It looks a lot like Essie's Mademoselle/Sugar Daddy which is what I used to always wear in a regular mani.
-
Thanks for the kind words Crystal! You are such a gem to work with I can't even tell you!
I'm so glad you're happy with them; it was an honor to have a small part in your planning efforts!
-
Voted. We need to get more people on this!!! Dumb #1 and #7!!
-
Quote:
Originally Posted by Mischaka and what salon did you go to??My salon is out on Long Island - Sway Nails & Spa in Manhasset - but if you get desperate, you can walk from the train station.Quote:Originally Posted by ErinB Do you mind me asking how much it was?
I paid $35. Not bad, given that I normally pay around $12 each week - acutally saved me $1! -
I am LOVING the OPI Axxium Soak-Off Gel Laquer!!!
I had mine done three weeks ago (yup, THREE weeks) before hubby and I went on vacation. We were in central america, went hiking, scuba diving, and all the sorts of things that would ruin a manicure in about 5 minutes. Even on a good day, my regular manicures start chipping in about 3-4 days.
But this one lasted for 3 weeks. While you could see where it's grown out (I used a sheer pale pink so it was hard to see), it was still really shiny and unchipped 3 weeks later.
It takes a little longer than your usual manicure - mine took about 45-50 minutes - because the set the gel with a UV light. And they didn't file the bejeezus out of the surface of my nail - they just buffed it down a tiny bit, which made me so happy. They soak it off with polish remover which took a while, but my nails looked normal and healthy when it was gone.
And while it was on, they didn't have that thick appearance like acryllic nails do.
Anyway, not all salons are doing these so you may have to hunt a bit - but how fabulous to know that your nails are going to hold up to a week in the sun/sand and still look great on your wedding day!!!
-
I'm sorry she's stepping on your toes. That's not fun!
But seriously, don't worry about it. Tell her in no uncertain terms that you do not want to hear ANYTHING about the resort or her experience. Tell her that you want it to be totally new to you because you want your wedding experience to be a something totally unique. Tell her that one of the reasons you picked the resort was because you didn't want anyone attending to give you input, so that it could be totally yours and yours alone. Get your FI on board, too.
And then anytime she opens her yap to tell you that you should *whatever*, hold up your hand and tell her you want it to be new when you get there, and walk away.
Oh, and yeah, that's not a nice thing for her to do. But MILs are a pain. I still tell everyone I know to marry an orphan.

Free Luggage Tag Holders - You Pay Shipping
in DIY Forum: Passport Invitation Template, Boarding Pass Invitation Templates and more
Posted
I'm cleaning out some of my old supplies and have a bunch of luggage tag holders in two styles that I no longer use.
I have approximately 50 clear hard plastic holders - something like the image below. Note that the loops that they come with are not particularly elegant, so you will likely want to replace those with ribbon, which is what I normally did for my clients:
I also have about 100 of vinyl/flexible tag holders, something like these, except that they are more of a clear frosted rather than the gray color shown here:
Each tag takes and insert the size of a business card (3.5 x 2 inches)
If you are interested, please PM me with the number you want and style you prefer (and whether you will take the other style if I've given away the ones you prefer), as well as your zip code so I can tell you how much the shipping will be. Payment for the shipping will be accepted by paypal.